Build Your IC Design Evironment Based on Cadence IC617 Package
For beginners, you may feel confident after reading papers. I mean I still remember when I first read a paper about Bandgap, what I thought is that the circuit is so easy, which I could make it as soon as the speed of light. However, the real scene was quit different, even thought the paper has clainmed the size of mosfets, capacitors and resistors.
So, here, I will tell you all how to install Cadence IC617 on a VM (Virtual Machine). And if you want to install it on a RM (Real Machine), you can follow the same way, too.
Announcement
I try my best to protect copyright by using the licensed software. But I don’t have access to the licensed Cadence, also the PDK, so you know …
Preparation
- A DVD installation ISO of
RHELoperating system. Cadence IC617 Pacckage.WinSCP.- Virtual machine software, eg.
Virtual Box,VMware Workstation PlayerandHyper-V.
I highly recommond you using Vrtual Box or VMware Workstation Player, because I felt the mouse pointer is quite fluent as in Windows Desk. Maybe Windows11 and my AMD 3900x caused it? Well, I don’t know~~~
Installation
I have divided the installation inroduction to two parts - OS installation and Cadence Installation. And I will do it using VMware Workstation Player.
OS
- Create a new virtual machine and add RHEL iso
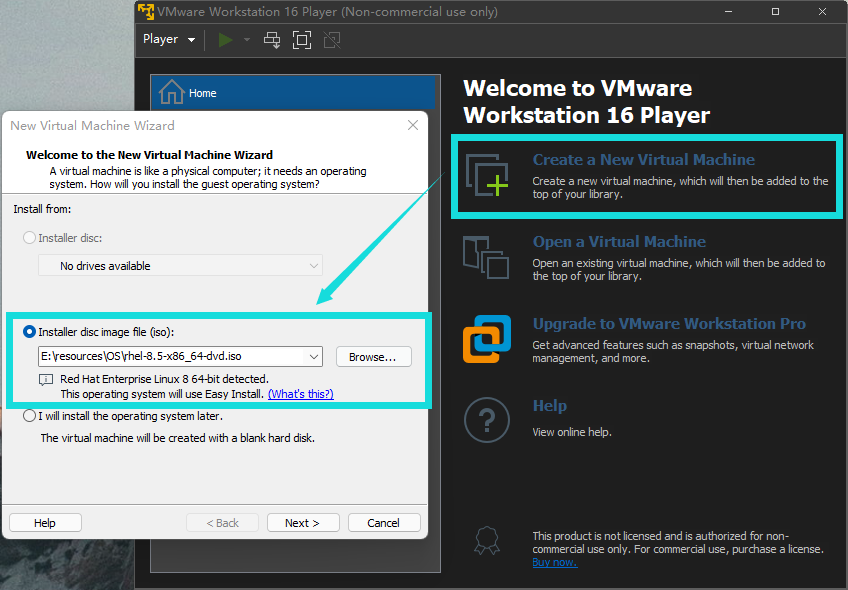
- Create your user name. It doesn’t matter if
Full namemismatchUser name.
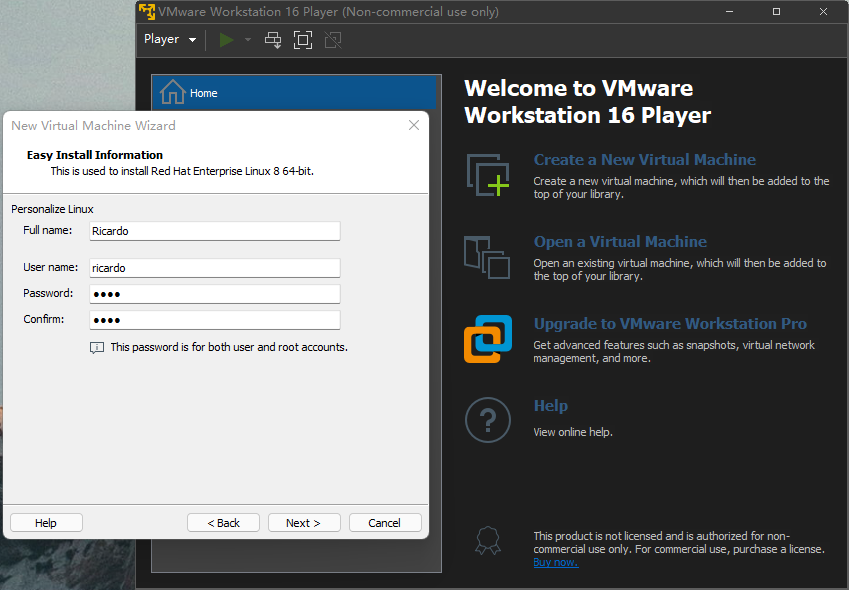
- Choose the location, where you want to install it and name the VM as your pleases.
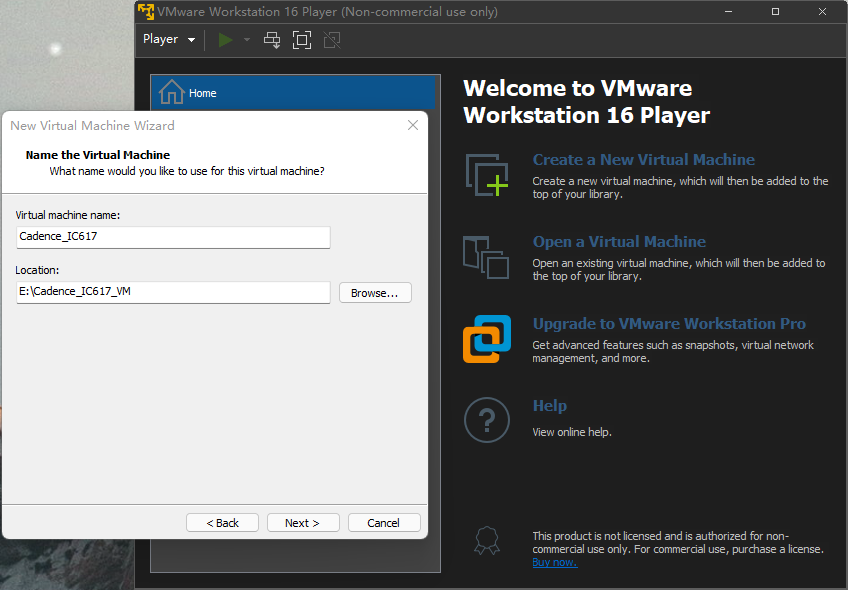
- Space allocation is 40GB at least. Because the operating system costs arround 2GB and the software package costs at least 18GB.

- Customize hardware. I recommond you to give the VM at least 8GB memory and 4 cores. Then click “finish” button and wait for the auto installation. It may cost you 10-20minutes depending on your PC’s performance.
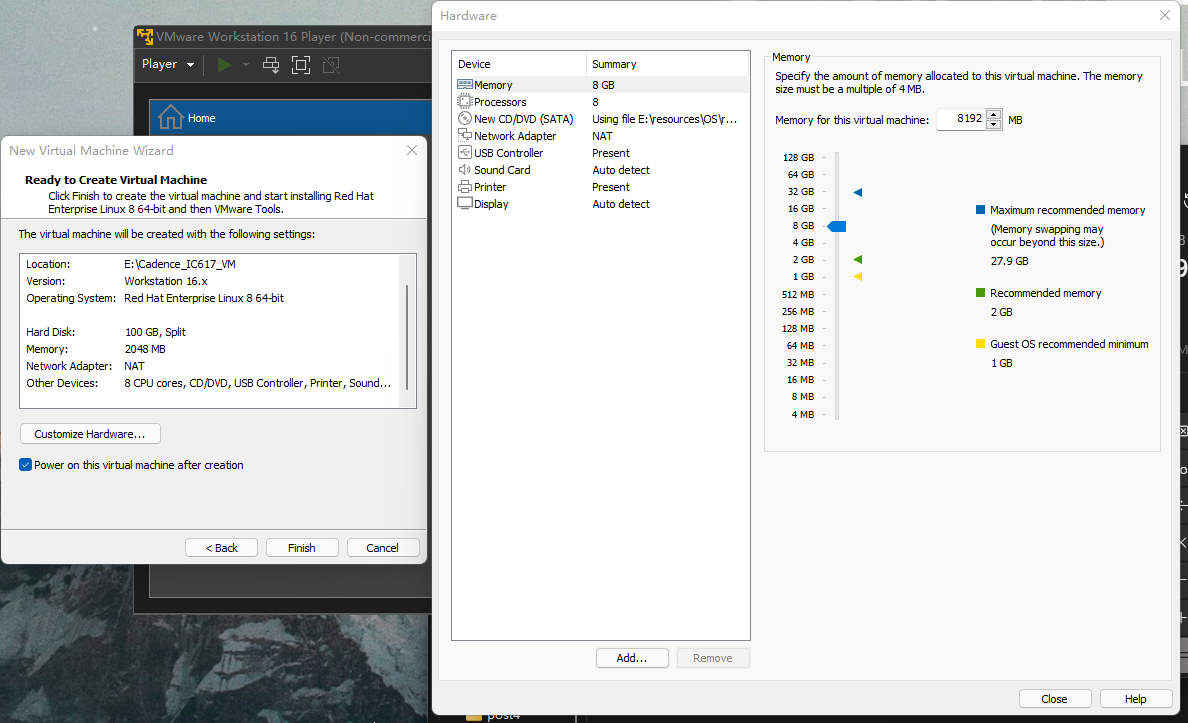
- Have fun and enjoy your RHEL? No! After login the system, you need to login your RedHat account to activate the RHEL.
- Go to Settings -> Details -> About, and then type in your RedHat account name and password, if you don’t have any organization, just keep it blank.
- Check for updates using
dnforyum.
su
dnf update && dnf upgrade
Environment
Before installing Cadence IC617, you must fit its dependence. Please open a terminal and type in the following.
dnf install ksh
dnf install csh
dnf install xterm
dnf install libXext.so.6
dnf install libXt.so.6
dnf install libGLU.so.1 --setopt=protected_multilib=false
dnf install libelf.so.1
dnf install libXrender.so.1
dnf install libXp.so.6
dnf install libXrandr.so.2
dnf install libXp
dnf install ld-linux.so.2
dnf install openmotif
dnf install libnsl.so.1
dnf install libnsl
dnf install ncurses
dnf install libXtst
dnf install libXi
dnf install python
dnf install net-tools
dnf install libstdc++
dnf install gcc
dnf install gcc-c++
dnf install redhat-lsb
dnf install libXss.so.1

ln -s /usr/bin/awk /bin/awk
cd /lib64
ln -s libcrypto.so.1.1 libcrypto.so.6
ln -s libreadline.so.6 libreadline.so.5
cd /usr/lib64
ln -s libhistory.so.6 libhistory.so.5

# set the hostname of OS
hostnamectl --static set-hostname xxx
Cadence
If it tells you don’t have any permission to do something or some installation failed, just use su to get the root privilege.
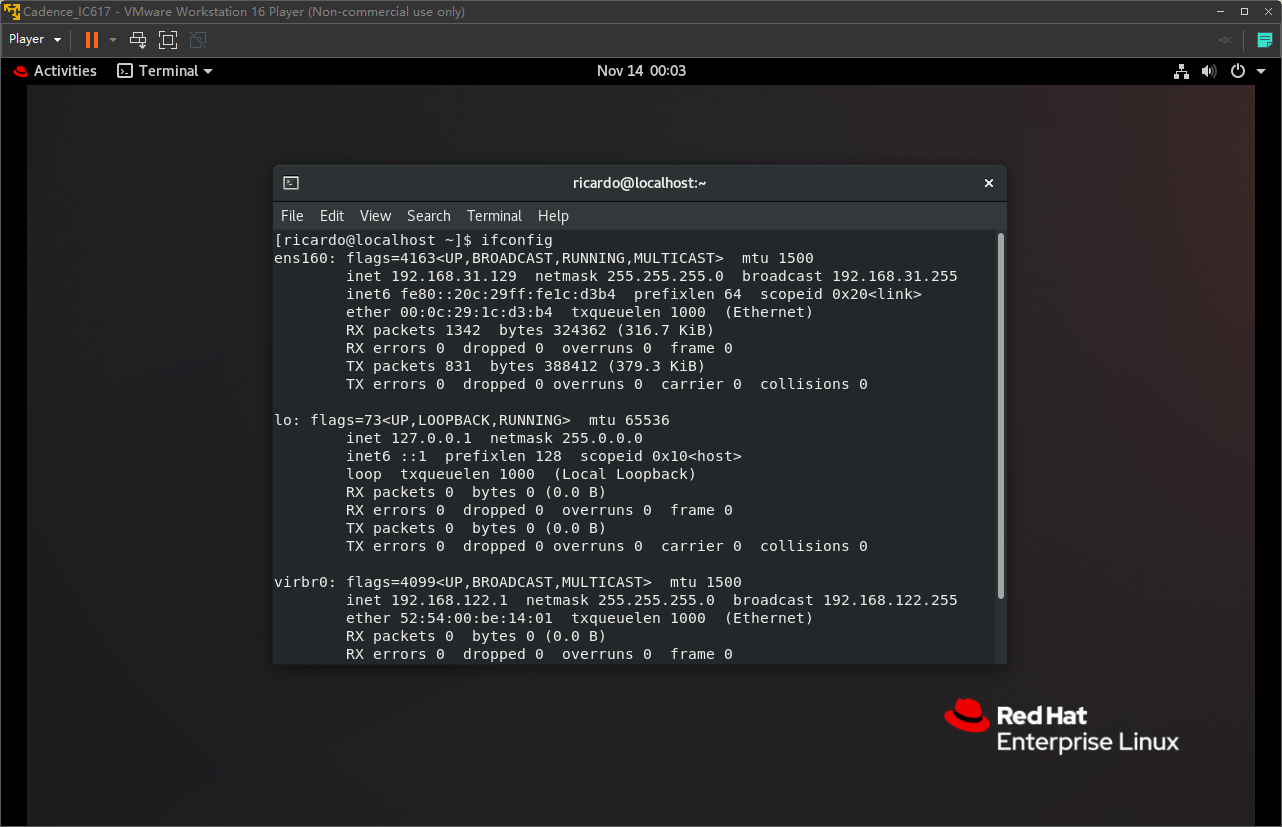
- Send the package to VM. First, you need to know the VM ip. Type in
ifconfigin shell and your VM ip is shown like this:
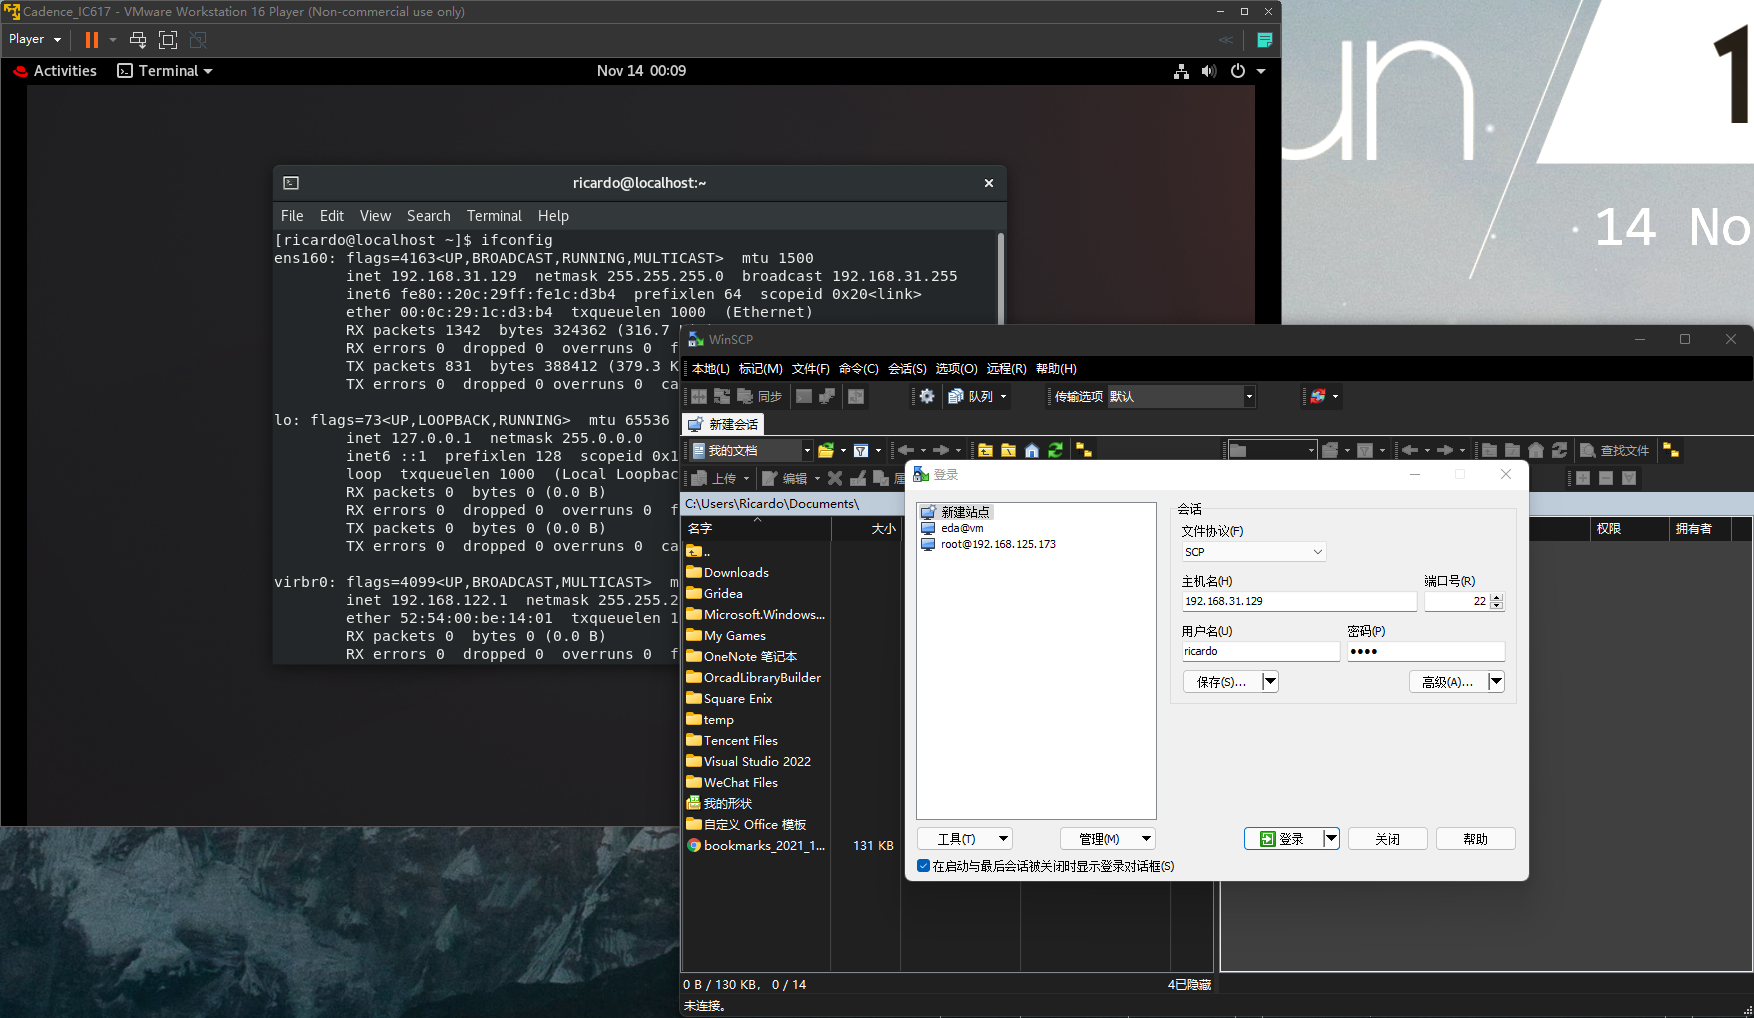
Then add the VM in WinSCP using SCP protocol. And save the details, so that you can transfer files between the RM and VM without type in the ip and so on again.
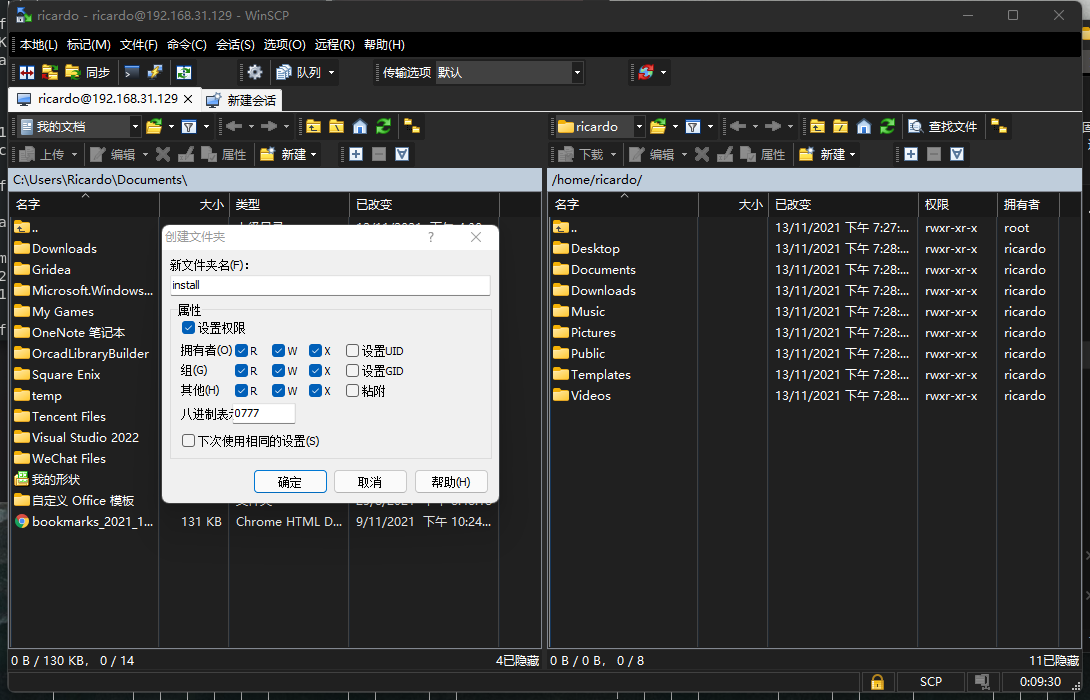
Finally, drag the package from RM to VM in WinSCP. But before that, create a folder firstly and set the privilige of the folder to 777.
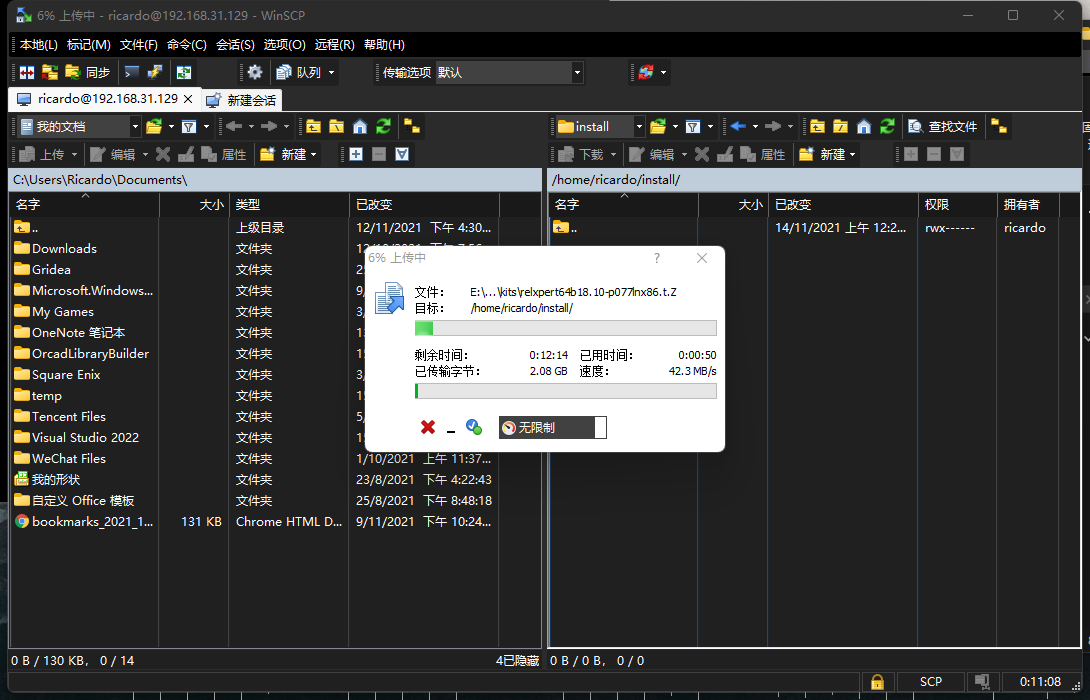
Wait until transfer completed.
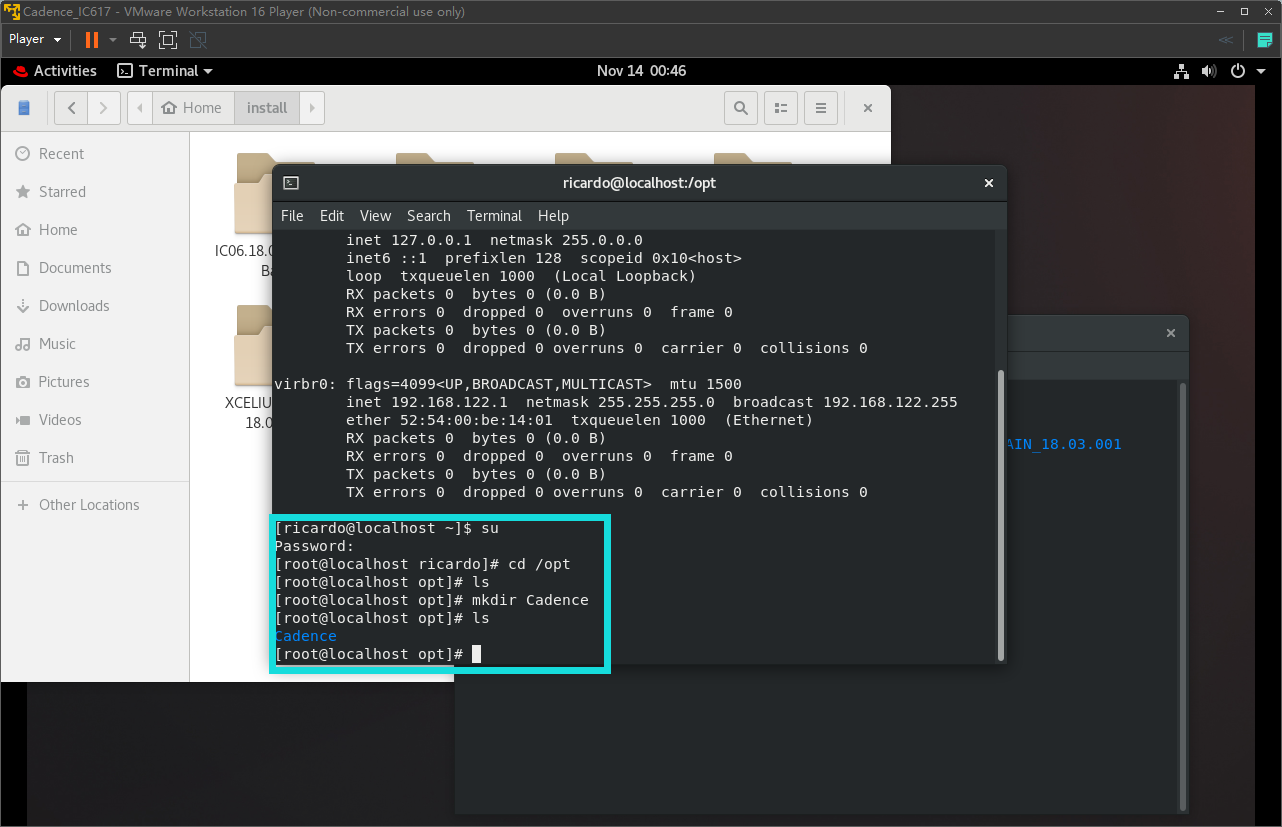
- Create a folder to install Cadence IC617, and to avoid some potential problems, I use
/opt/Cadence.
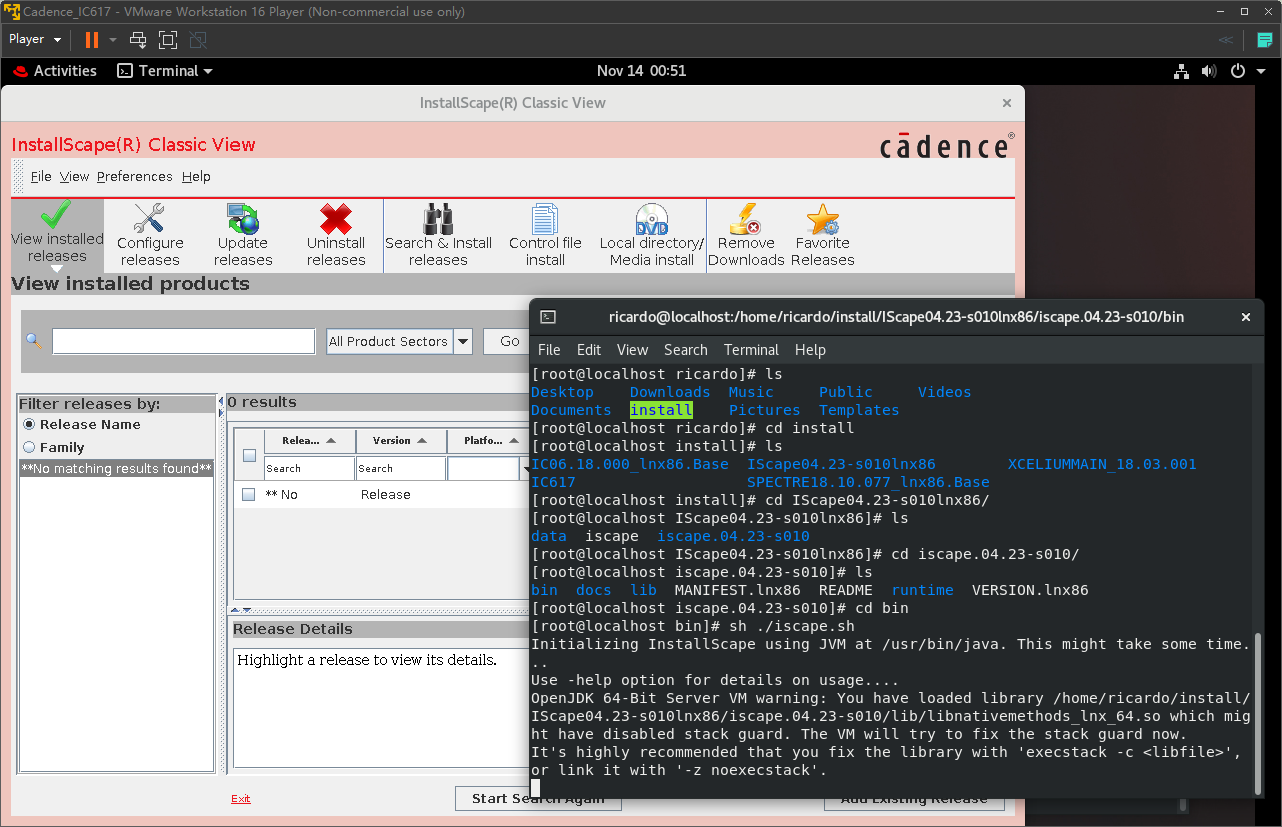
- Back to the package archive folder, and install
Iscapefirst. BecauseIscapeis a tool to install IC617. Use this commandsh iscape.sh
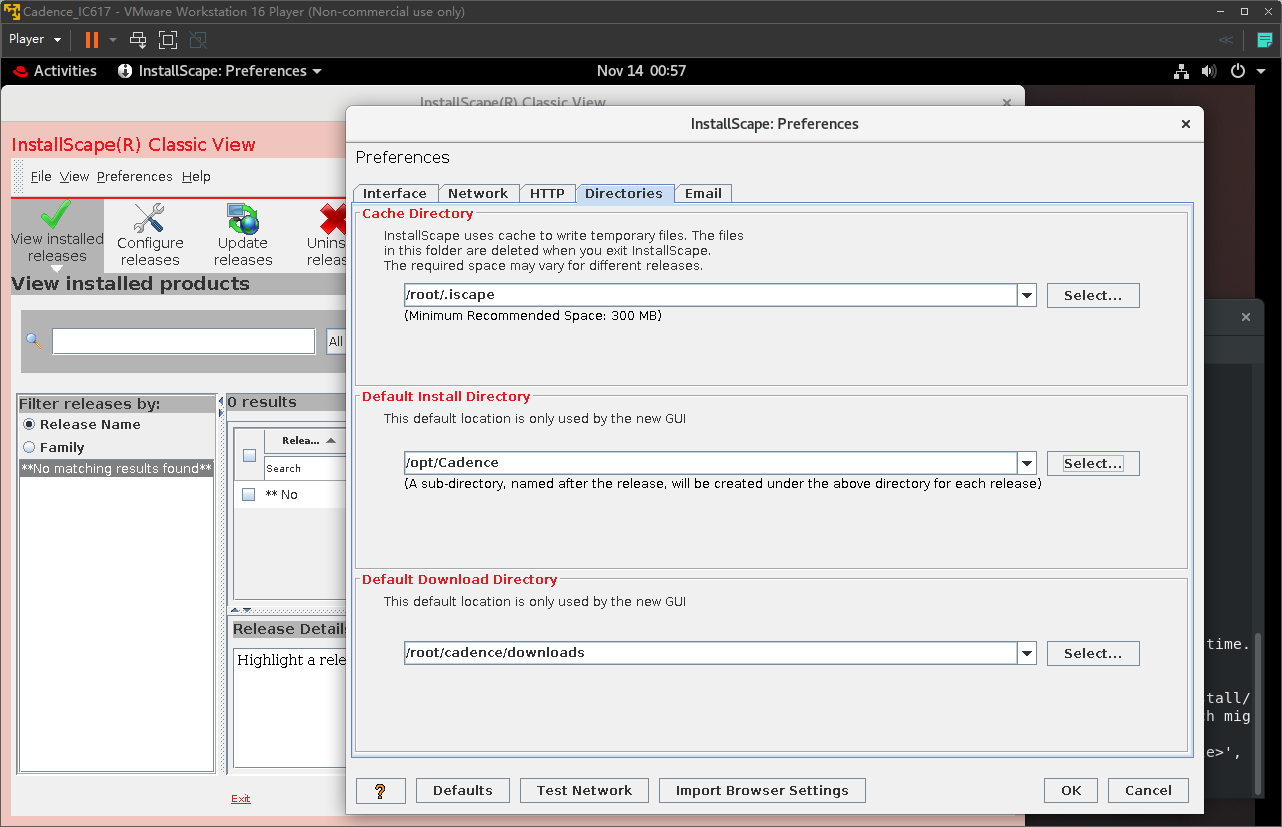
- Click
Preferences->InstallScape->Directions, and changeDefault Install Directoryto the new created folder/opt/Cadence. What’s more, you can change other directions whatever you like, but keep others as default.
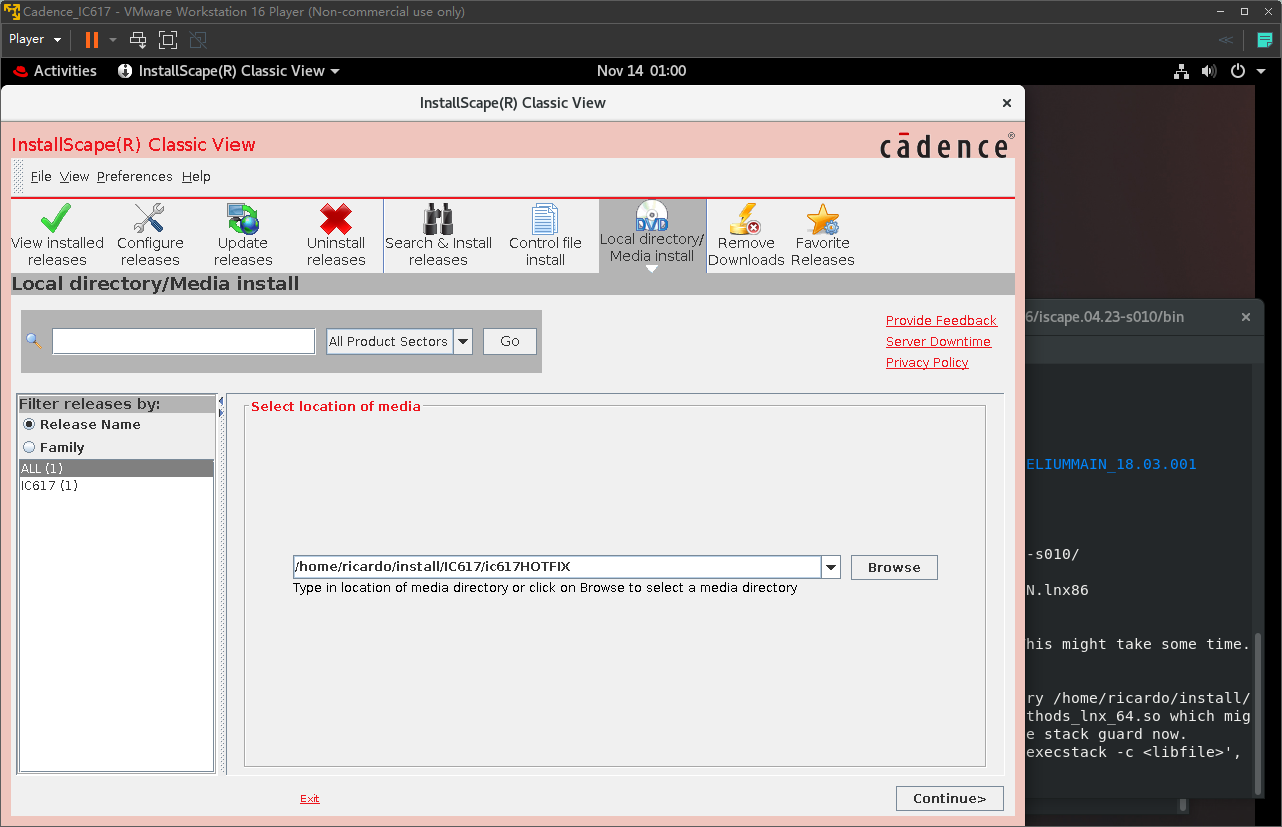
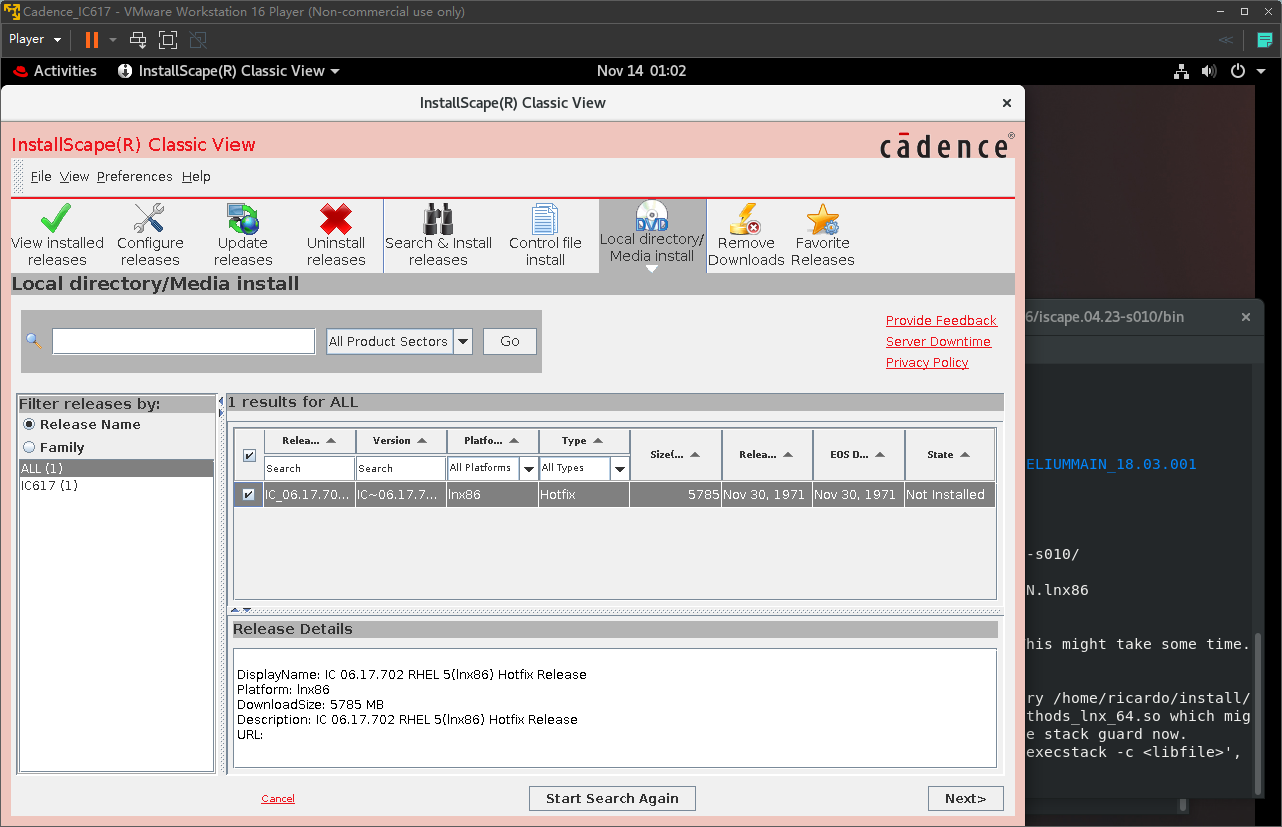
- Choose
Local directory/Media installand browse to find the install packageIC617Hotfix
- Check the checkbox of
IC_617and next.
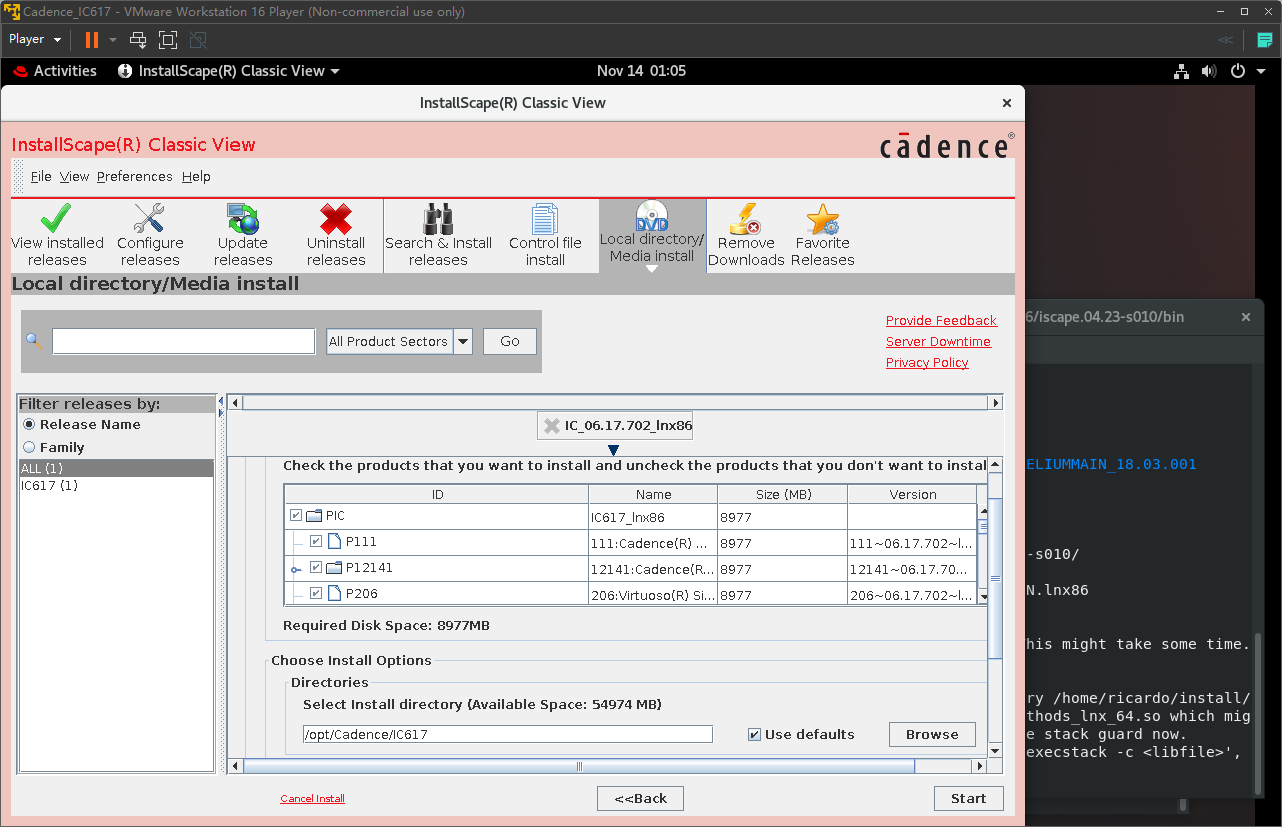
- Select all
PICand check if the install directin is right.
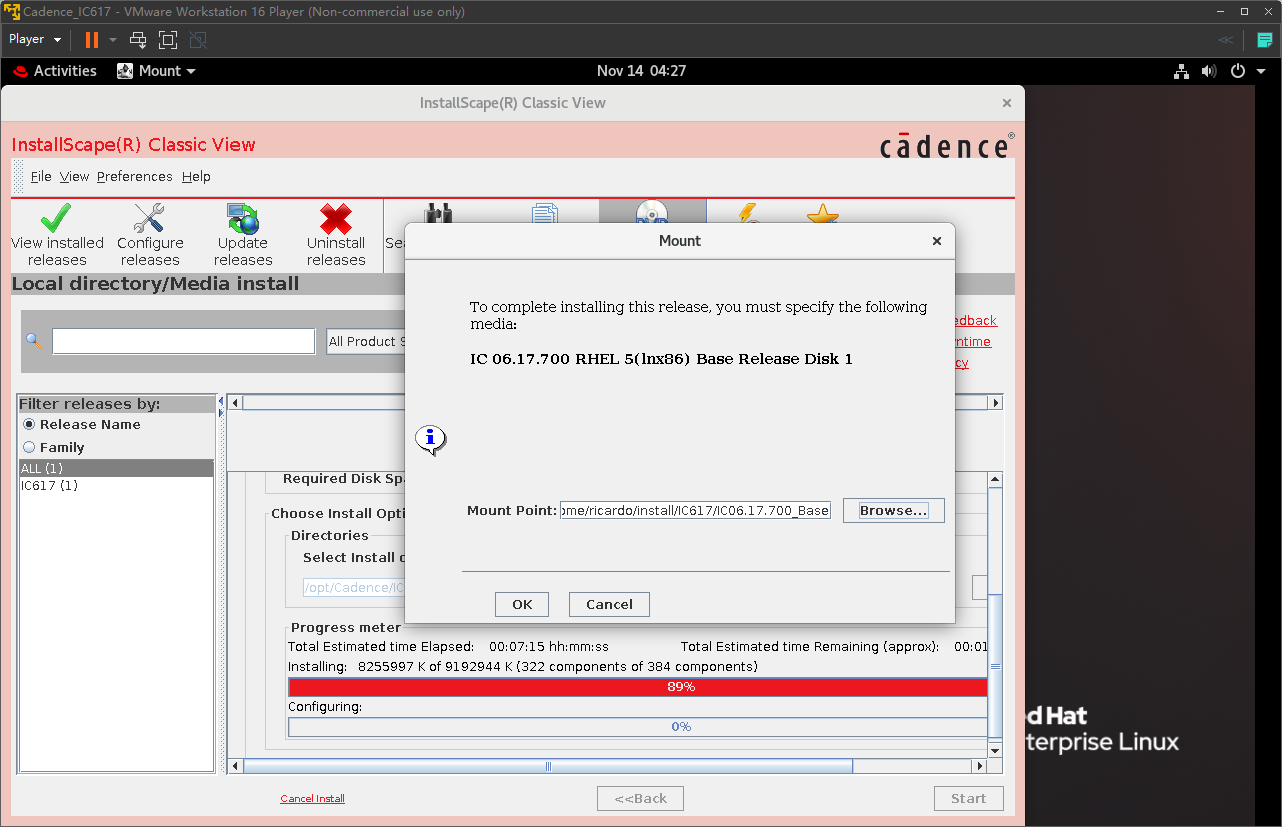
Choose the base CD in the same directoryIC617xxx_base, which is the original install file of Cadence. You knowhotfixmeanskpiof programmers, which doesn’t contain the original version.
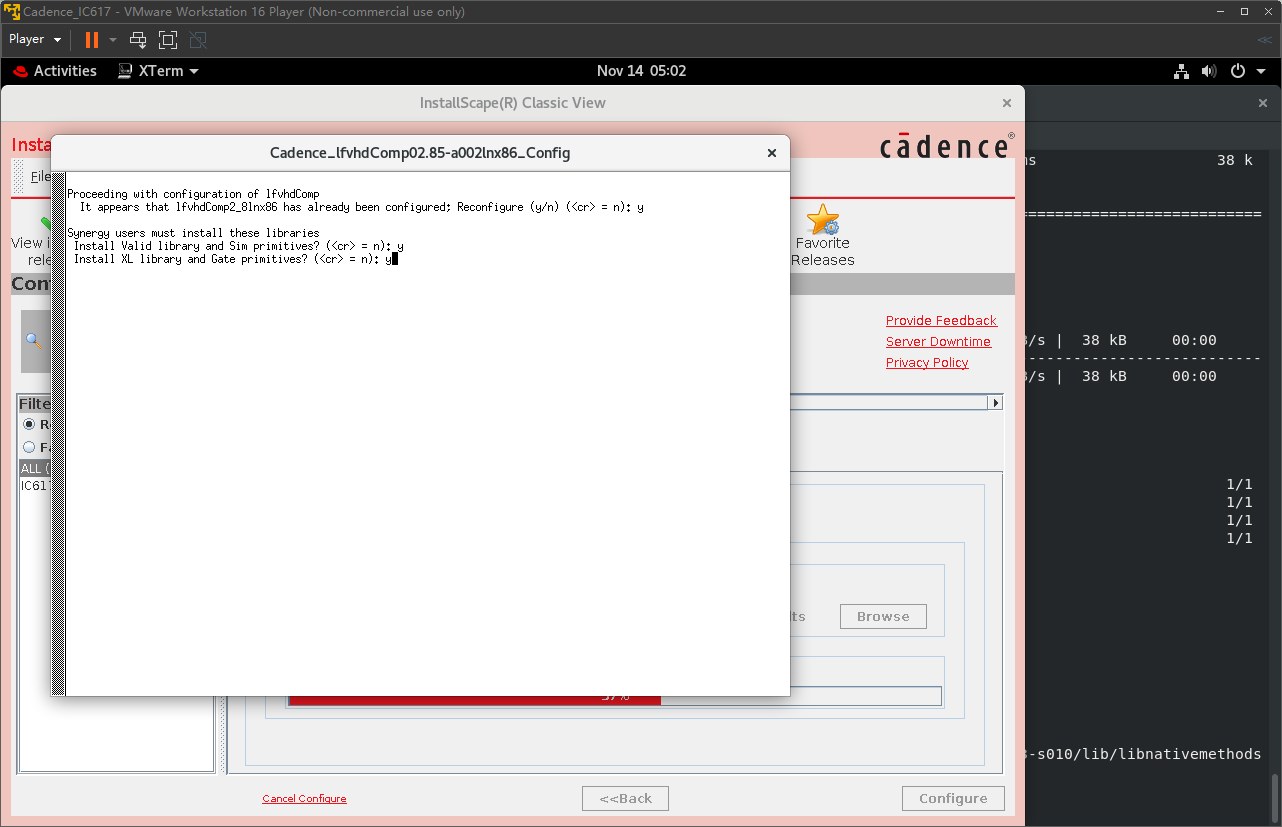
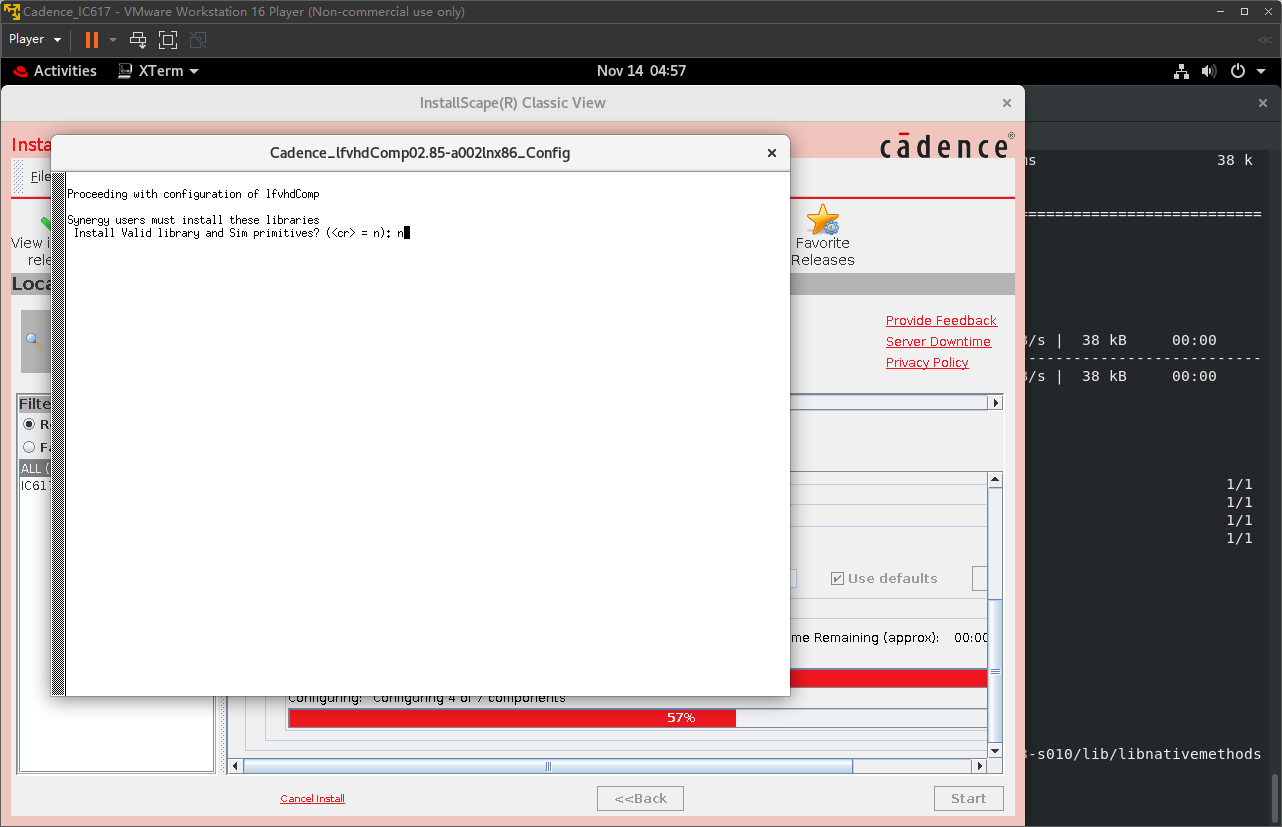
Keep pressingEnterandyto install “Valid library and Sim primitives” and “XL library and Gate primitives”.
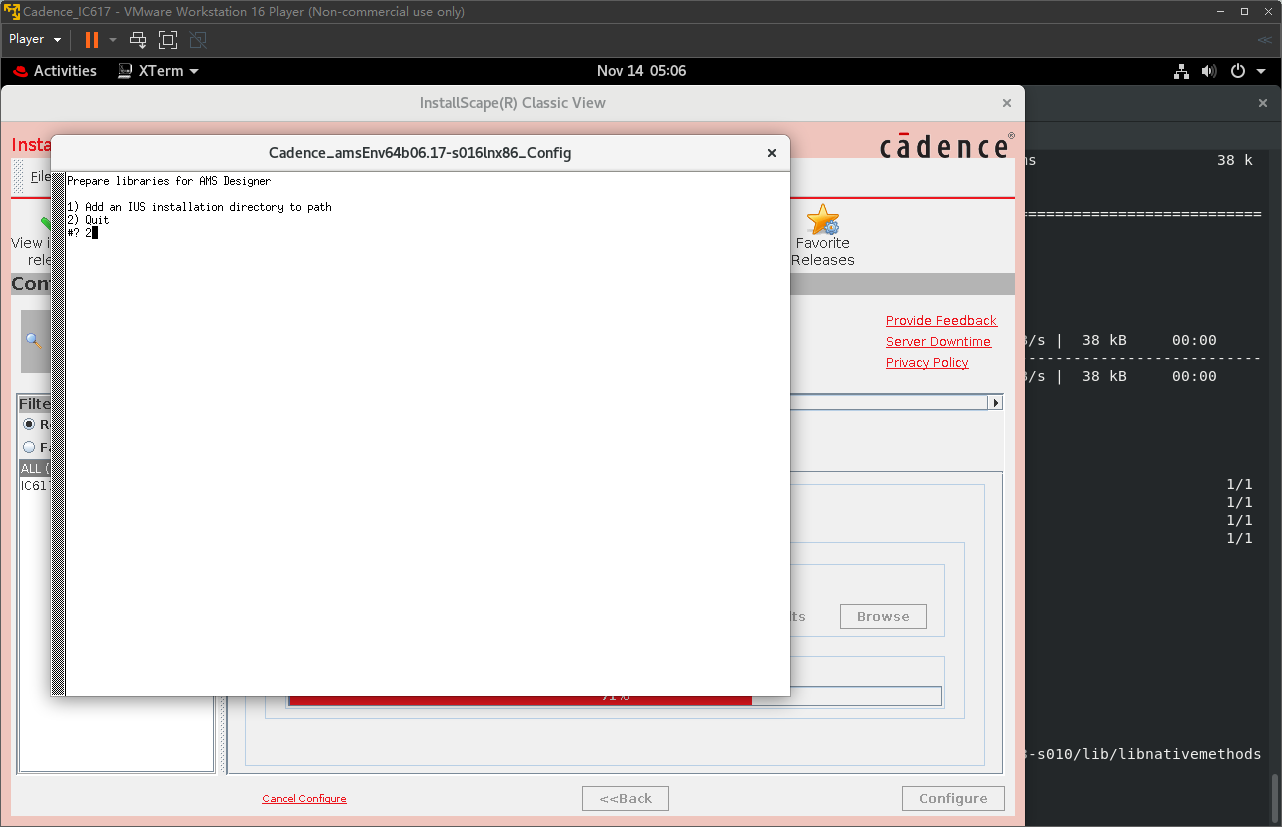
When you are asked if “Prepare libraries for AMS Designer”. type in2to “Quit”.
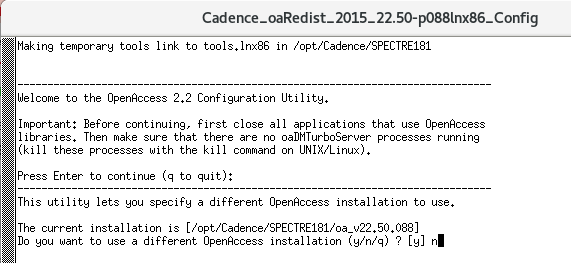
Do not pressnuntil the program asks “Do you want to use a different OpenAccess installation (y/n/q)?”.
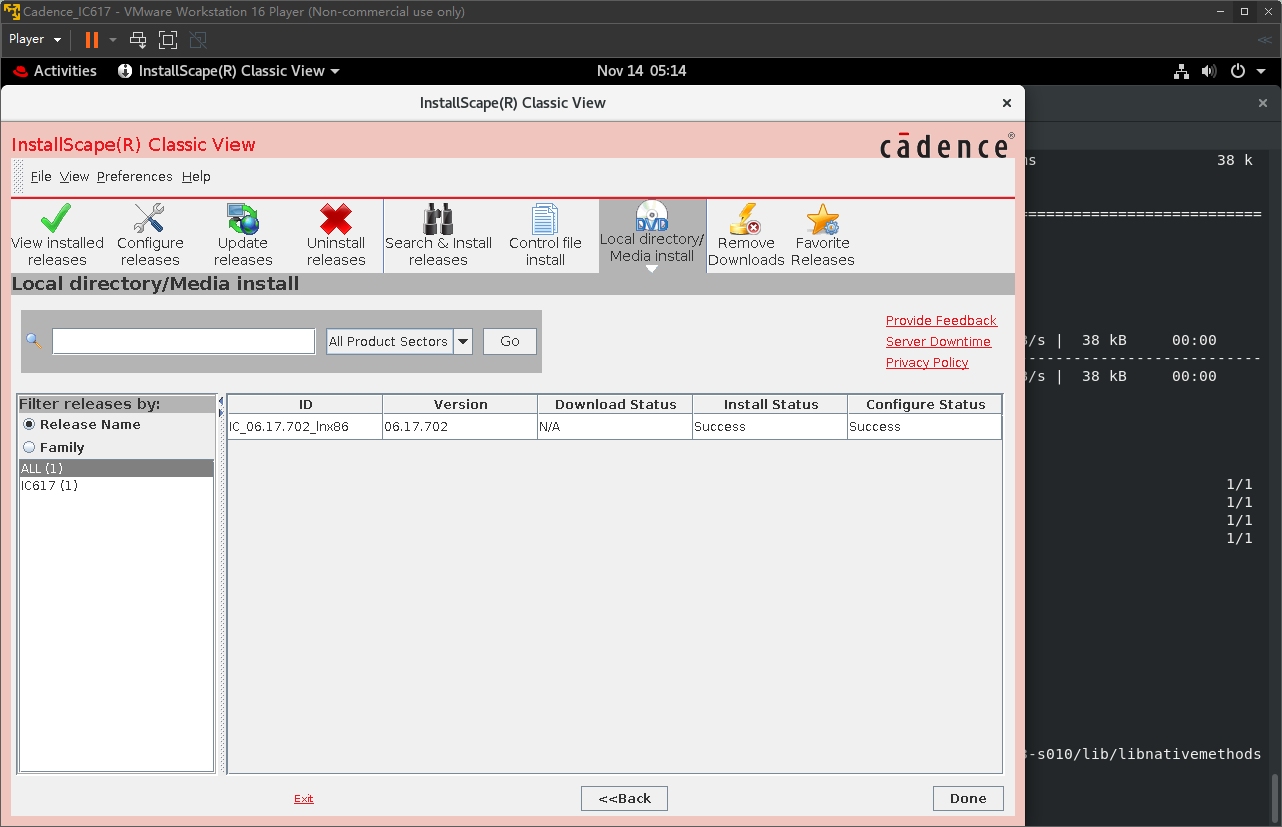
If you see both “Install Status” and “Configure Status” are “success”, you can go to the next step or you canConfigure releasesto reconfigure.
- Install “Spectre18” and “XCELIUMMAIN” in the same way as installing “IC617”. And Do type in
nwhen bing asked if you want to use a different OpenAccess installation (y/n/q).


- I believe you may feel amazed when you see the file type of Calibre installation package. It is “.exe”! Yes, it is “.exe”, but you cannot install it on Windows.
First, create an installation folder in/opt/mentor/Calibre2019
mkdir /opt/mentor/Calibre2019
mv /(original place)/Calibre/*  /opt/mentor/Calibre2019
cd /opt/mentor/Calibre2019
chmod 777 aoj_cal_2019.3_15.11_mib.exe
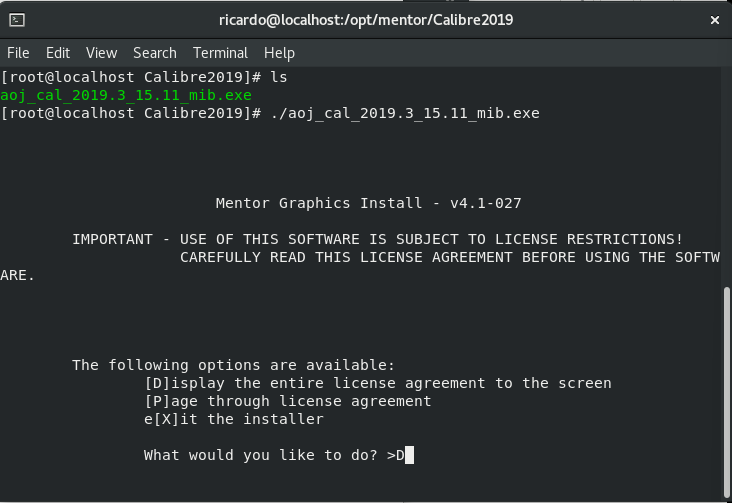
./aoj_cal_2019.3_15.11_mib.exe ( -tgt /target_folder)
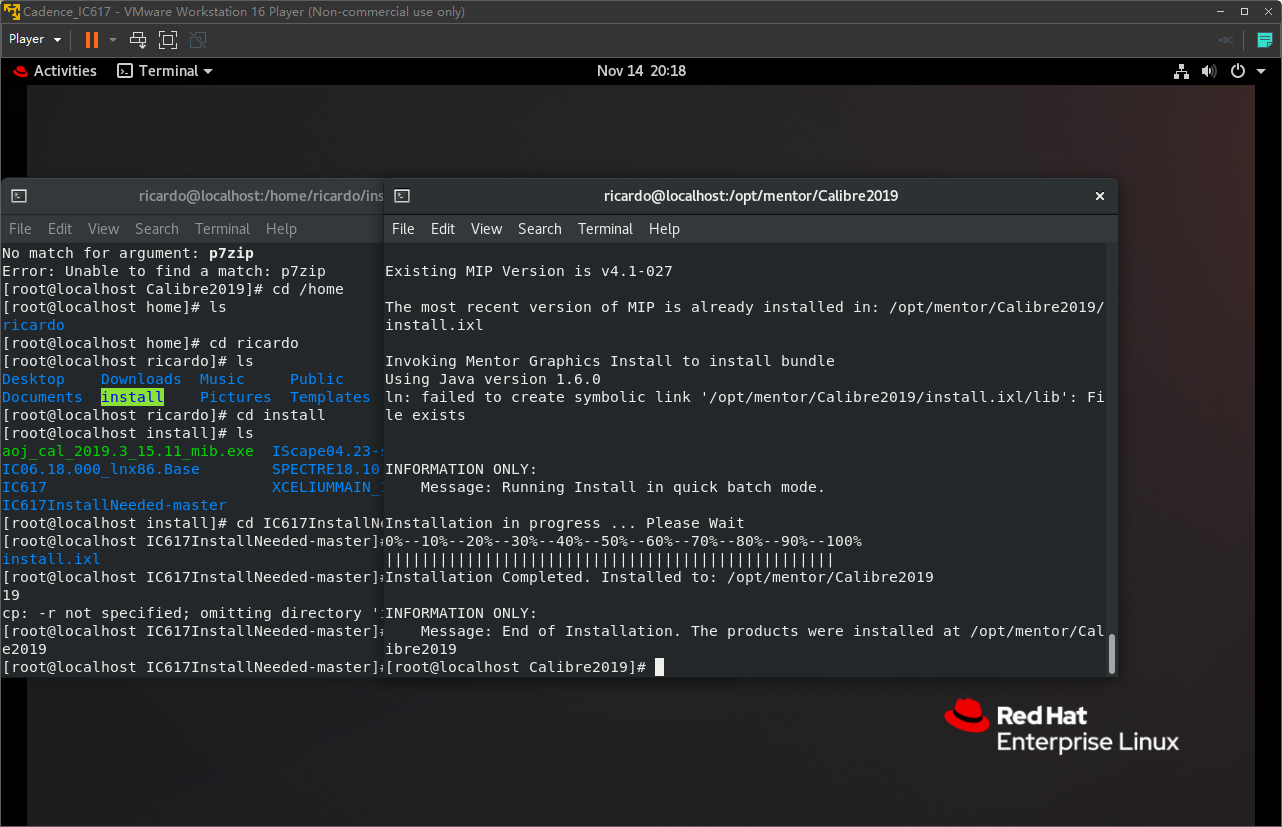
Then type in D and yes.
And wait …
Patch
- Generate IC617 license.
su
cd patch
python3 cdslicgen.py
cp ./license.dat /opt/Cadence/IC617/share/license
chmod 777 /opt/Cadence/IC617/share/license/license.dat
- Generate Calibre license.
Type inifconfigto find the local “Mac address”, which is called “ether”.
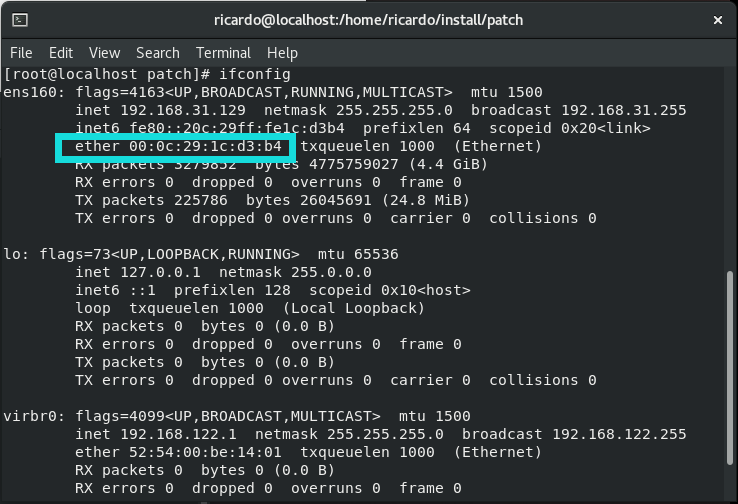
python3 mgclicgen.py (Mac address)
You may meet an error. I’m sorry, but I don’t know how to solve it by adding a command in the python file. You can replace “HOSTID” by the Mac address manually and save the crack code as a new “license.dat”. Then
cp license.dat /opt/mentor/license/
chmod 777 /opt/mentor/license/license.dat
- The only difference between IC617 license and XCELIUMMAIN license is
FEATURE Xcelium_Limited_Single_Core
FEATURE XceliumLimitedSingleCoreLegacy
FEATURE Xcelium_Single_Core
FEATURE Xcelium_Single_Core_Legacy
FEATURE Xcelium_Safety
FEATURE Xcelium_Safety_Option
FEATURE Xcelium_Multi_Core
FEATURE Xcelium_For_Partners
FEATURE Xcelium_SC_DMS_Option
FEATURE Xcelium_MC_GLS_SDF_Option
FEATURE Xcelium_MC_LP_Option
FEATURE Xcelium_MC_DFT_Option
FEATURE Integrated_Metrics_Center
which you need to add to /opt/cadence/IC617/share/license/license.dat.
4. Patch to crack Cadence IC617.
su
cd patch
sh ./1patch.sh /opt/Cadence/IC617
sh ./1patch.sh /opt/Cadence/SPECTRE181
sh ./1patch.sh /opt/Cadence/XCELIUM1803
sh ./1patch.sh /opt/mentor/Calibre2019
- Add to path. Modify
.bashrcin home location and paste them to the following lines. Remember to change the “hostname” below.
#--------------------------------------------------------------------------------------------------
#  User's Guide
#
#  Copy this .bashrc environment setting file to the working (design project) directory, e.g.
#  /home/johndoe/project1, /home/johndoe/project2, ...., etc.
#
#  On terminal, cd to the working directory and then source the .bashrc file by typing the
#  following at the shell prompt $:
#  . .bashrc
#  Note:  a space is required between "." and ".bashrc" in the above command.
#
#  Now all the environment variables in .bashrc file have been loaded into the current shell
#  terminal and commands can be issued at the shell prompt $ to launch various Cadence
#  tools, for instance, "virtuoso &" (without the quotes).  Some frequently used commands are
#  listed in this file together with corresponding environment settings.
#
#  You may finish the Cadence session at any time by closing the running Cadence tool.  To
#  start up another Cadence session, just issue another Cadence command at the shell
#  prompt $, e.g. "innovus &" (without the quotes), etc. To exit the entire Cadence
#  environment, close the terminal.  By closing the terminal, all loaded Cadence and Calibre
#  environment variables are terminated since all of these variables are loaded and
#  contained in the terminated shell terminal.  The benefit of sourcing .bashrc to a local shell
#  terminal instead of setting them in the $HOME/.bashrc is that all of the loaded Cadence &
#  Calibre environment variables don't globally affect system environment settings and
#  therefore you can run other programs on the system normally and won't disturb the
#  Cadence session or vice versa.
#
#  If you're setting up a multiuser server, create a client copy of this .bashrc file and make
#  necessary changes accordingly, e.g. point CDS_LIC_FILE to the server's license directory
#  as port@hostname.  Instruct users to download it to the working directory on the client
#  machine and source the client copy before starting up any Cadence tool.
#--------------------------------------------------------------------------------------------------

#+++++++++++++++++++++++++++++++++++++++++++++++++++++++++++++++++++++++++++++++++
# For proper distributed processing execution using Cadence PVS software, it requires
# that the following is set as the first line in .bashrc
# Note: the space between the ! and $prompt is required!
#+++++++++++++++++++++++++++++++++++++++++++++++++++++++++++++++++++++++++++++++++
if (! $prompt); then
  exit
fi

##############################################################
# Cadence Design Systems
#
# Master IC CAD flow including schematic capture, simulation, layout, and verification.
##############################################################
#!!!!!!!!!!!!!!!!!!!!!!!!!!!!!!!!!!!!!!!!!!!!!!!!!!!!!!!!!!!!#
export CADHOME=/opt/Cadence
#!!!!!!!!!!!!!!!!!!!!!!!!!!!!!!!!!!!!!!!!!!!!!!!!!!!!!!!!!!!!#

# Requied for Cadence on Linux
export LANG=C

# Set netlisting mode
export CDS_Netlisting_Mode=Analog

#+++++++++++++++++++++++++++++++++++++++++++++++++++++++++++++++++++++++
# Specify a search order for .cdsenv
#
# Load .cdsenv in the working directory ($CWD)
#+++++++++++++++++++++++++++++++++++++++++++++++++++++++++++++++++++++++
export CDS_LOAD_ENV=CWD

#+++++++++++++++++++++++++++++++++++++++++++++++++++++++++++++++++++++++
# browser setup for Cadence Help
#+++++++++++++++++++++++++++++++++++++++++++++++++++++++++++++++++++++++
export MOZILLA_HOME=/usr/bin/firefox

#+++++++++++++++++++++++++++++++++++++++++++++++++++++++++++++++++++++++
# Cadence - IC
#
# IC Schematic Entry, Simulation, Layout, Verification (Diva)
#+++++++++++++++++++++++++++++++++++++++++++++++++++++++++++++++++++++++
#!!!!!!!!!!!!!!!!!!!!!!!!!!!!!!!!!!!!!!!!!!!!!!!!!!!!!!!!!!!!#
export CDS=$CADHOME/IC617
#!!!!!!!!!!!!!!!!!!!!!!!!!!!!!!!!!!!!!!!!!!!!!!!!!!!!!!!!!!!!#

#+++++++++++++++++++++++++++++++++++++++++++++++++++++++++++++++++++++++
# Some of these variables are used by various other tools, e.g. foundry's PDK.
# Set them to be safe
#+++++++++++++++++++++++++++++++++++++++++++++++++++++++++++++++++++++++
export CDSDIR=$CDS
export CDSHOME=$CDS
export Cadence_DIR=$CDS
export CDS_INST_DIR=$CDS
export CDS_ROOT=$CDS
export CDSROOT=$CDS

#+++++++++++++++++++++++++++++++++++++++++++++++++++++++++++++++++++++++
# Set up either CDS_LIC_FILE or LM_LICENSE_FILE, but NOT both or it'll
# take long time to search license!!!
#
# Set variable CDS_LIC_ONLY to ignore LM_LICENSE_FILE if it exists.
#
# Use absolute PATH to license.dat file instead of port@hostname
#
# The license server is no longer needed once all features are set to uncounted or 0
# (unlimited use) for the FEATURE lines in license.dat.  The SERVER, VENDOR and
# USE_SERVER lines can be safely removed from license.dat file, i.e. license.dat here
# contains FEATURE lines only.  DO NOT START UP LICENSE SERVER DAEMON!!!
#+++++++++++++++++++++++++++++++++++++++++++++++++++++++++++++++++++++++
#!!!!!!!!!!!!!!!!!!!!!!!!!!!!!!!!!!!!!!!!!!!!!!!!!!!!!!!!!!!!#
export CDS_LIC_FILE=$CDS/share/license/license.dat
export CDS_LIC_ONLY=1
#!!!!!!!!!!!!!!!!!!!!!!!!!!!!!!!!!!!!!!!!!!!!!!!!!!!!!!!!!!!!#

# Support for 64-bit executables (this should be set for 64-bit hosts - IMPORTANT!!!)
export CDS_AUTO_64BIT=ALL

#+++++++++++++++++++++++++++++++++++++++++++++++++++++++++++++++++++++++
# Master IC PATH
#
#+++++++++++++++++++++++++++++++++++++++++++++++++++++++++++++++++++++++
export PATH=$PATH:$CDSDIR/tools/dfII/bin:$CDSDIR/tools/plot/bin

#+++++++++++++++++++++++++++++++++++++++++++++++++++++++++++++++++++++++
# Set up OA (OpenAccess)
#
# It is STRONGLY recommended that you DO NOT change the OA installation that
# each tool uses because tools are tested with the version of OA shipped with the
# particular tool such as EDI142. However, if it is necessary to use a different
# version of OA, you can do so with one of the following approaches:
# 1) Use the Configure utility on InstallScape to specify a different OA installation.
# 2) Use the OA_HOME environment variable to override the default OA installation.
#
# DO NOT set up OA_HOME as recommended above!  Instead use the default OA
# installed within each Cadence tool, or use Configure utility on InstallScape to
# re-set OA back to the original default OA installation in each product such as.EDI,
# EXT, etc. if they were ever changed.
#+++++++++++++++++++++++++++++++++++++++++++++++++++++++++++++++++++++++

# Set up Cadence unsupported systems such as Ubuntu Linux
# IC617 supports Ubuntu14.04 so this variable is no longer required
#export OA_UNSUPPORTED_PLAT=linux_rhel50_gcc44x

# To run Virtuoso Schematic and Verilog Driven Mixed-Signal Flow,  the following
# environment variable must be set before starting Virtuoso.
export CDS_ENABLE_VMS=1

#+++++++++++++++++++++++++++++++++++++++++++++++++++++++++++++++++++++++
# Cadence Analog Simulators (MMSIM) - Spectre, SpectreRF, &
# RelXpert (Reliability Simulator)
#
#+++++++++++++++++++++++++++++++++++++++++++++++++++++++++++++++++++++++
#!!!!!!!!!!!!!!!!!!!!!!!!!!!!!!!!!!!!!!!!!!!!!!!!!!!!!!!!!!!!#
export MMSIMHOME=$CADHOME/SPECTRE181
export PATH=$PATH:$MMSIMHOME/bin:$MMSIMHOME/tools/relxpert/bin
#!!!!!!!!!!!!!!!!!!!!!!!!!!!!!!!!!!!!!!!!!!!!!!!!!!!!!!!!!!!!#

#+++++++++++++++++++++++++++++++++++++++++++++++++++++++++++++++++++++++
# Cadence QRC Extraction, Advanced Analysis & Modeling (EXT)
#
# Note: QRC must appear in the PATH before Assura executables
#+++++++++++++++++++++++++++++++++++++++++++++++++++++++++++++++++++++++
export QRC_HOME=$CADHOME/EXT151
export PATH=$PATH:$QRC_HOME/bin

# Enhance precision of QRC for DFM MOS extraction
export QRC_MOS_LW_PRECISION=Y

#+++++++++++++++++++++++++++++++++++++++++++++++++++++++++++++++++++++++
# Cadence Assura (ASSURA) - DRC. LVS, parasitic extraction
#
# These executables should be on the PATH after DFII executables
#+++++++++++++++++++++++++++++++++++++++++++++++++++++++++++++++++++++++
#export ASSURAHOME=$CADHOME/ASSURA41
#export PATH=$PATH:$ASSURAHOME/tools/bin:$ASSURAHOME/tools/assura/bin

# Setting this variable enables Assura to work with PVS licenses only without
# attempts to check-out Assura licenses first and thus speeds up execution.
#export ASSURA_USE_PVS_LICENSE=1

# Set up foundry DFM PATH for Assura - CRNxxG/CRNxxLP process for current project
export TSMC_ASU_DFM_PATH=/opt/PDKs/tsmc/CRNxxG/Assura/lvs_rcx/DFM
#export TSMC_ASU_DFM_PATH=/opt/PDKs/tsmc/CRNxxLP/Assura/lvs_rcx/DFM

#+++++++++++++++++++++++++++++++++++++++++++++++++++++++++++++++++++++++
# Cadence Physical Verification System, MaskCompose, & QuickView (PVS)
#
# K2_VIEWER_HOME must be set before Quickview is invoked. LM_LICENSE_FILE
# is required to run any K2 product.
#+++++++++++++++++++++++++++++++++++++++++++++++++++++++++++++++++++++++
export K2_HOME=$CADHOME/PVS151/tools/K2
export K2_VIEWER_HOME=$K2_HOME/Viewer
export K2_MASKCOMPOSE_HOME=$K2_HOME/MaskCompose
export K2_MC_DATA=$HOME/Projects
export LM_LICENSE_FILE=$CDS_LIC_FILE
export PATH=$PATH:$CADHOME/PVS151/bin:$CADHOME/PVS151/tools/bin:$K2_MASKCOMPOSE_HOME/bin
export XKEYSYMDB=$CDSDIR/tools/plot/etc/XKeysymDB

# Commands on terminal to launch Quickview or MaskCompose
#k2_viewer &
#k2_mcs &

##############################################################
# Cadence Digital Flow - HDL Simulations, Synthesis, P&R
#
##############################################################
# Genus Synthesis Solution (GENUS) - Logic & Physical Synthesis
export PATH=$PATH:$CADHOME/GENUS152/tools/bin

# Command on terminal to launch Genus
# genus

# RTL Power Analysis (Joules)
export PATH=$PATH:$CADHOME/JLS151/bin

# Command on terminal to start Joules
# joules &

# Innovus Implementation System (INNOVUS) - P&R
export PATH=$PATH:$CADHOME/INNOVUS152/bin

# Command on terminal to launch Innovus
# innovus &

#+++++++++++++++++++++++++++++++++++++++++++++++++++++++++++++++++++++++
# Cadence C-to-Silicon Compiler (CTOS)
#+++++++++++++++++++++++++++++++++++++++++++++++++++++++++++++++++++++++
export PATH=$PATH:$CADHOME/CTOS142/bin

# Command on terminal to launch CTOS
# ctosgui &

#+++++++++++++++++++++++++++++++++++++++++++++++++++++++++++++++++++++++
# Encounter Conformal (CONFRML) - Constraint Designer, Low Power Designer,
# & ECO Designer
#+++++++++++++++++++++++++++++++++++++++++++++++++++++++++++++++++++++++
export PATH=$PATH:$CADHOME/CONFRML152/bin

#+++++++++++++++++++++++++++++++++++++++++++++++++++++++++++++++++++++++
# Command on terminal to launch Confirmal with license options:
# -xl/-gxl/-rcv/-eco/-ecogxl/-lp/-lpxl/-ccd/-ccdxl/-lpgxl/-verify;
#  default is set to -l if no option is given.
# example:  "lec -lp -verify -gui &" for Low Power license and Verify license
#+++++++++++++++++++++++++++++++++++++++++++++++++++++++++++++++++++++++
# lec -lpgxl -verify -gui &

#+++++++++++++++++++++++++++++++++++++++++++++++++++++++++++++++++++++++
# Silicon Signoff & Verification (SSV) - including Tempus Timing Signoff
# & Voltus IC Power Integrity
#+++++++++++++++++++++++++++++++++++++++++++++++++++++++++++++++++++++++
export PATH=$PATH:$CADHOME/SSV152/tools/bin

# Command on terminal to launch tempus or voltus
# tempus &
# voltus &

#+++++++++++++++++++++++++++++++++++++++++++++++++++++++++++++++++++++++
# Incisive Verification Platform - Digital HDL simulators
#
#+++++++++++++++++++++++++++++++++++++++++++++++++++++++++++++++++++++++
export PATH=$PATH:$CADHOME/INCISIVE151/bin:$CADHOME/INCISIVE151/tools/bin::$CADHOME/INCISIVE151/tools/vtools/vfault/bin

#+++++++++++++++++++++++++++++++++++++++++++++++++++++++++++++++++++++++
# For 3-step (ncvlog, ncelab, and ncsim) flow to run Virtuoso AMS Designer simulator,
# the following library path environment variable has to be set.
#
# For single-step (irun) running AMS simulator, LD_LIBRARY_PATH is not required.
#+++++++++++++++++++++++++++++++++++++++++++++++++++++++++++++++++++++++
export LD_LIBRARY_PATH=$CADHOME/INCISIVE151/tools/lib/64bit:$CADHOME/INCISIVE151/tools/lib

# Enable noise analysis in AMS designer
AMS_ENABLE_NOISE=YES

#+++++++++++++++++++++++++++++++++++++++++++++++++++++++++++++++++++++++
# Set up Universal Verification Methodology (UVM) Environment Variables
#
# uvm_home defines the path to the UVM class library
# ml_uvm defines the path to the ml_uvm code
# ml_seq_dir defines the path to the SystemVerilog ml_uvm_seq package for using
# sequencer stubs
# The SystemVerilog package ml_uvm_seq is included in the Specman installation.
# To use it, you must add the following command-line options to your compilation flow,
# as additional command-line arguments to irun or ncvlog :
# irun ... ${ML_SEQ_DIR}/ml_uvm_seq.sv -incdir ${ML_SEQ_DIR}
#+++++++++++++++++++++++++++++++++++++++++++++++++++++++++++++++++++++++
export uvm_home=$CADHOME/INCISIVE151/tools/uvm
export ml_uvm=$CADHOME/INCISIVE151/tools/uvm/uvm_lib/uvm_ml/sc/ml_uvm
export ml_seq_dir=$CADHOME/INCISIVE151/specman/src

#+++++++++++++++++++++++++++++++++++++++++++++++++++++++++++++++++++++++
# Set up the HOME Environment Variable for Incisive Verification Kits
# Source the appropriate environment setup file (Note: a space is required
# between . and $SOCV_KIT_HOME/env.sh)
#+++++++++++++++++++++++++++++++++++++++++++++++++++++++++++++++++++++++
export SOCV_KIT_HOME=$CADHOME/INCISIVE151/kits/VerificationKit
#. $SOCV_KIT_HOME/env.sh

# Command on terminal to start up Incisive Verification Kits
# start_kit &

#***********************************************************************
# Command on terminal to launch NClaunch
#***********************************************************************
# nclaunch &

# Command on terminal to start up Specman & SimVision
# specman -gui &

# Command on terminal to invoke Desktop Manager
# emanager -desktop &
# vmanager &

# Encounter Diagnostics & Test (ET)
export PATH=$PATH:$CADHOME/ET151/bin

#+++++++++++++++++++++++++++++++++++++++++++++++++++++++++++++++++++++++
# Command on terminal to launch ET,  or with license options: -architect/-truetime/-diag
# commands eta, ett and ediag are equivalent to et -architect, et -truetime and et -diag
# which invokes Encounter Test Architect,  Encounter True_time Delay Test and
# Encounter Diagnostics, respectively.
#+++++++++++++++++++++++++++++++++++++++++++++++++++++++++++++++++++++++
# eta &
# ett &
# ediag &

#+++++++++++++++++++++++++++++++++++++++++++++++++++++++++++++++++++++++
# Verification IP Product Catalog (VIPCAT)
#
# VIP products are configured using a GUI called PureView.
#+++++++++++++++++++++++++++++++++++++++++++++++++++++++++++++++++++++++
export CDN_VIP_ROOT=$CADHOME/VIPCAT113
export Cadence_VIP_LIC_ORDER=newrev:soc:portfolio:alacarte
export ABVIP_ISNT_DIR=$CDN_VIP_ROOT/tools/abvip
# In e , set SPECMAN_PATH to the location of the specific UVC directory
export SPECMAN_PATH=$PATH:$CDN_VIP_ROOT/utils:$CDN_VIP_ROOT/packages:$CDN_VIP_ROOT/vips/enet/vr_enet
export DENALI=$CDN_VIP_ROOT/tools/denali_64bit
export PATH=$PATH:$DENALI/bin
# In SV, add the UVC by including the specific VIP SV directory in the irun command:
#irun -incdir $CDN_VIP_ROOT/vips/enet/vr_enet/sv

# Command on terminal to launch PureView to configure VIP products.
# pureview

#+++++++++++++++++++++++++++++++++++++++++++++++++++++++++++++++++++++++
# Manufacturability and Variability Sign-Off (MVS) - Litho Analyzers,
# CMP Predictor
#+++++++++++++++++++++++++++++++++++++++++++++++++++++++++++++++++++++++
export PATH=$PATH:$CADHOME/MVS152/tools/bin

# Commands on terminal to launch Litho Analyzers, CMP Predictor
#lpa &
#lea &
# need to figure out correct license keys in license.dat for CMP Predictor
# (current ones don't work)
#cmms -ccp &
#cmms -ccpo &

#+++++++++++++++++++++++++++++++++++++++++++++++++++++++++++++++++++++++
# Library Characterizer (Liberate)
#
# Include the integrated Spectre in PATH
#+++++++++++++++++++++++++++++++++++++++++++++++++++++++++++++++++++++++
#export ALTOSHOME=$CADHOME/LIBERATE151
#export PATH=$PATH:$ALTOSHOME/bin
#export PATH=$PATH:$ALTOSHOME/tools.lnx86/spectre/bin
#export ALTOS_64=1

#+++++++++++++++++++++++++++++++++++++++++++++++++++++++++++++++++++++++
# Set up NCSU CDK
#
# This is optional for educational purpose; use foundry provided PDKs
# instead for production projects by including foundry PDKs in cds.lib
# in the working directory.
#+++++++++++++++++++++++++++++++++++++++++++++++++++++++++++++++++++++++
#!!!!!!!!!!!!!!!!!!!!!!!!!!!!!!!!!!!!!!!!!!!!!!!!!!!!!!!!!!!!#
export CDK_DIR=/opt/PDKs/ncsu-cdk-1.6.0.beta
#!!!!!!!!!!!!!!!!!!!!!!!!!!!!!!!!!!!!!!!!!!!!!!!!!!!!!!!!!!!!#

#+++++++++++++++++++++++++++++++++++++++++++++++++++++++++++++++++++++++
# Mentor Graphics Calibre
#+++++++++++++++++++++++++++++++++++++++++++++++++++++++++++++++++++++++
export MGC_HOME=/opt/mentor
export CALIBRE_HOME=$MGC_HOME/Calibre2019/aoj_cal_2019.3_15.11
export MGLS_LICENSE_FILE=$MGC_HOME/license/license.dat
export PATH=$PATH:$CALIBRE_HOME/bin
export MGC_LIB_PATH=$CALIBRE_HOME/lib

export CALIBRE_OS_MSG_LEVEL=1

#***********************************************************************
# Enable Calibre RealTime with Cadence Virtuoso
#***********************************************************************
export MGC_CALIBRE_REALTIME_VIRTUOSO_ENABLED=1

#+++++++++++++++++++++++++++++++++++++++++++++++++++++++++++++++++++++++
# This variable enables Calibre Interactive to save all GUI settings including default
# values to a runset file for future re-run
#+++++++++++++++++++++++++++++++++++++++++++++++++++++++++++++++++++++++
export MGC_CALIBRE_SAVE_ALL_RUNSET_VALUES=1

#+++++++++++++++++++++++++++++++++++++++++++++++++++++++++++++++++++++++
# Set up socket connection with Virtuoso schematic or layout viewer (using default ports
# 9199 for schematic and 9189 for layout) in the form of host:port
#+++++++++++++++++++++++++++++++++++++++++++++++++++++++++++++++++++++++
export MGC_CALIBRE_SCHEMATIC_SERVER=hostname:9199S
export MGC_CALIBRE_LAYOUT_SERVER=hostname:9189

#+++++++++++++++++++++++++++++++++++++++++++++++++++++++++++++++++++++++
# The license server is no longer needed once all features are set to uncounted or 0
# (unlimited use) for the FEATURE lines in license.dat. file.  The SERVER, VENDOR and
# USE_SERVER lines can be safely removed from license.dat file, i.e. license.dat here
# contains FEATURE lines only.  DO NOT START UP LICENSE SERVER DAEMON!!!
#+++++++++++++++++++++++++++++++++++++++++++++++++++++++++++++++++++++++

#***********************************************************************
# Set the name of the executable for displaying PDF documentation from Calibre Help
# menu. The default is acroread if it exists.  Make sure evince has been installed before
# setting up the following (on Ubuntu type command "sudo apt-get install evince").
#***********************************************************************
export MGC_PDF_READER=evince

#+++++++++++++++++++++++++++++++++++++++++++++++++++++++++++++++++++++++
# Command on terminal to launch Cadence Virtuoso tools
#
# Adding & runs the process in the background allowing to continue using
# the current terminal.
#+++++++++++++++++++++++++++++++++++++++++++++++++++++++++++++++++++++++
#virtuoso &

#!!!!!!!!!!!!!!!!!!!!!!!!!!!!!!!!!!!!!!!!!!!!!!!!!!!!!!!!!!!!#
export SYSTEM_CDS_LIB_DIR=/opt/Cadence/IC617/share/cdssetup
#!!!!!!!!!!!!!!!!!!!!!!!!!!!!!!!!!!!!!!!!!!!!!!!!!!!!!!!!!!!!#
export OA_UNSUPPORTED_PLAT=linux_rhel50_gcc48x

# User specific aliases and functions
# User specific aliases and functions
####################
# Cadence
#####################
export INCISIVDIR=/opt/Cadence/XCELIUM1803/
export VRST_HOME=/opt/Cadence/XCELIUM1803/
export LM_LICENSE_FILE=/opt/Cadence/license/Cadence.dat
export LD_LIBRARY_PATH=$LD_LIBRARY_PATH:/opt/Cadence/XCELIUM1803/tools.lnx86/lib
alias irun="/opt/Cadence/XCELIUM1803/tools.lnx86/lib/bin/irun"
alias simv="/opt/Cadence/XCELIUM1803/tools.lnx86/lib/bin/simvision"
alias simvision="/opt/Cadence/XCELIUM1803/tools.lnx86/bin/simvision -64 &"
alias ncvlog="/opt/Cadence/XCELIUM1803/tools.lnx86/bin/ncvlog"
alias ncsim="/opt/Cadence/XCELIUM1803/tools.lnx86/bin/ncvsim"
alias ncelab="/opt/Cadence/XCELIUM1803/tools.lnx86/bin/ncelab"
alias ncvhdl_p="/opt/Cadence/XCELIUM1803/tools.lnx86/bin/ncvhdl_p"
export SPECMAN_HOME=$INCISIVDIR/components/sn
export SPECMAN_DIR=$SPECMAN_HOME/
export PATH="$PATH:$INCISIVDIR/bin"
export PATH="$PATH:$INCISIVDIR/tools.lnx86/bin"
export PATH="$PATH:$INCISIVDIR/tools.lnx86/dfII/bin"

alias i="icfb&"
alias v="virtuoso&"
WORKdir="~/newpdk/HHGRACE_PDK_BCD350GE/prj"
alias cdw="cd $WORKdir"
Enjoy it
Go to your workspace and start it.
But to use it gracefully I highly recommand you to create a start bash and a desktop icon.
start.sh
#!/bin/sh
cd /home/ricardo/Project
virtuoso&
Then give the privilige to run the shell script using chmod 777 start.sh.
Virtuoso.desktop
[Desktop Entry]
Encoding=UTF-8
Version=1.0
Type=Application
Terminal=true
Exec=/home/ricardo/Project/start.sh
Name=Virtuoso
Icon="the folder where you save the jpg of Virtuoso"
Finally give the privilige to run the .desktop using chmod 777 Virtuoso.desktop.
Enjoy it!